- Print
- DarkLight
- PDF
On-premise installation
Your company has chosen to work with the Cooperlink platform and we thank you for that.
This article shows you the steps you need to follow to install Cooperlink on-premise and integrate it with your tools. If you have any questions, do not hesitate to contact your account manager, or alternatively, our technical support via the chat tool located at the bottom right of your screen.
On-premise hosting
On-premise hosting allows you to benefit from a Cooperlink server dedicated to your organization and the complete storage of your data in your own infrastructure. So you're in complete control of your data security.
Step 1 - Installing the Cooperlink server on-premise
Once your agreement with Cooperlink is signed, our team will install your on-premise server and your Cooperlink tenant. Once these are set up, you will be provided with an administrator account.
Virtual machine
For the installation of Cooperlink in your own infrastructure, a virtual machine must be prepared with the following recommended configuration. The specifications are indicative and depend on the actual usage of your Cooperlink server.
| CONNECT ONLY | CONSTRUCTION APPS | |||
| Users | N/A | 100 users | 250 users | 500 users and more |
| Operating System | Preferrably Debian 12(1) | |||
| Virtual Machines | 1 | 1 | 1 | 2 |
| vCPU | 4 | 8 | 8 | 2 x 8 |
| RAM | 16 GB | 16 GB | 24 GB | 2 x 16 GB |
| SSD HD | 100 GB | 100 GB | 250 GB | 100 GB / 250 GB |
(1) Cooperlink will provide full support to the customer when the preferred distribution is used. Alternatively, the customer can choose any Linux or Windows Server with support to docker technology. In this latter case, the customer will ensure the operation and maintenance of the Docker Engine. For Windows Server technology, you will find more information on https://learn.microsoft.com/en-us/virtualization/windowscontainers/quick-start/set-up-environment?tabs=dockerce#windows-server-1
Firewall & Domain
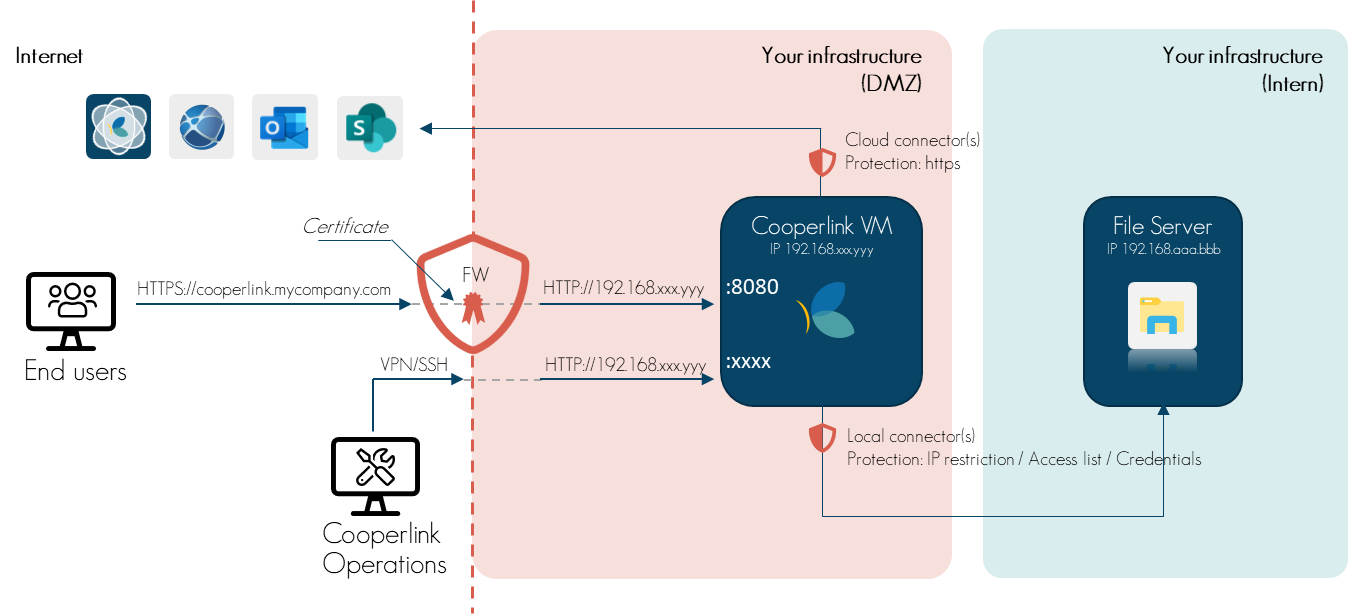
The VM's web services must be exposed to the Internet (https port 443).
The http port will be automatically redirected to the https port.
A domain name must be provided of type https://cooperlink.mycompany.com (illustration).
In the case of integration of on-premise tools, the firewall is configured to allow secure communication between the Cooperlink server and the on-premise tools.

Certificate
A certificate for the subdomain is installed on the firewall. If you are unable to install a certificate on your firewall, please contact our support.
Reverse Proxy
External port 443 is redirected to an internal port of the virtual machine using a reverse proxy from the firewall. In the absence of a Reverse Proxy, Cooperlink can offer you one on the virtual machine.
Access for installation and maintenance (Network Operations Center)
Cooperlink's Network Operations Center must be able to create a one-time connection with the virtual machine for installation, updates, and maintenance.
Access restriction is implemented via SSH or VPN, as well as IP address restrictions. Cooperlink uses fixed IP addresses. This will be communicated securely to your technical point of contact
Step 2 - Tenant Installation
Our team will then install your tenant on the Cooperlink server on-premise.
Step 3 - Connectors
Technical Information
In order to integrate Cooperlink with your current tools (e.g. sharepoint, file server, email server, etc.), it is necessary to configure connectors.
The following information is required to enable configuration:
- Click here for the necessary information by connector and registration procedures to follow
- For each connector, a licensed user is required including appropriate access rights on the target libraries
If the installation is carried out by Cooperlink, please provide us with this information via the secured support portal.
Access for testing
If the connector configuration is done by Cooperlink, it is necessary to provide access to test data. This information is communicated via the support portal.
Technical Point of Contact
We recommend that you create an account on our support portal https://support.cooperlink.io and provide us with the single point of contact in the event of a technical incident that requires information from you.
Let's go for configuration
Congratulations, Cooperlink is now accessible and your workflows can be configured.


